We redid our entire budget in January of 2021 and started using a sinking fund. It has worked so incredibly well ever since and I’m so excited to share our method with you today!

In the summer of 2020, Colter and I had been married for about a year and a half and Calvin was five months old. Before Calvin was born, we didn’t manage our money at all. It completely managed us. We got “lucky” and our income level qualified us for State insurance to cover his birth, but once he was here and healthy we realized that we needed to make some big changes unless we wanted to be living from paycheck to paycheck forever.
One of the biggest changes we made to the way we used our income was to create a sinking fund that we regularly contribute to and use specifically and diligently. I’ll walk you through the process we used to get our fund created and paid in full.
WHAT IS A SINKING FUND?
By definition, a sinking fund is money periodically set aside to pay off a debt or a bond. As we don’t have any debts or bonds, our sinking fund is a little bit different.
We use our sinking fund as a place to put money that we are already planning to spend. We know that throughout the year there are going to be expenses to be paid that aren’t a regular monthly occurrence, but aren’t avoidable either. These expenses are things like semiannual car insurance payments, Christmas gifts, oil changes, tire rotations, birthday gifts, annual traditions, bigger clothes and shoes for the kids as they grow, etc. I know that I’ll need money for these things, so we set aside money every week to pay for them.
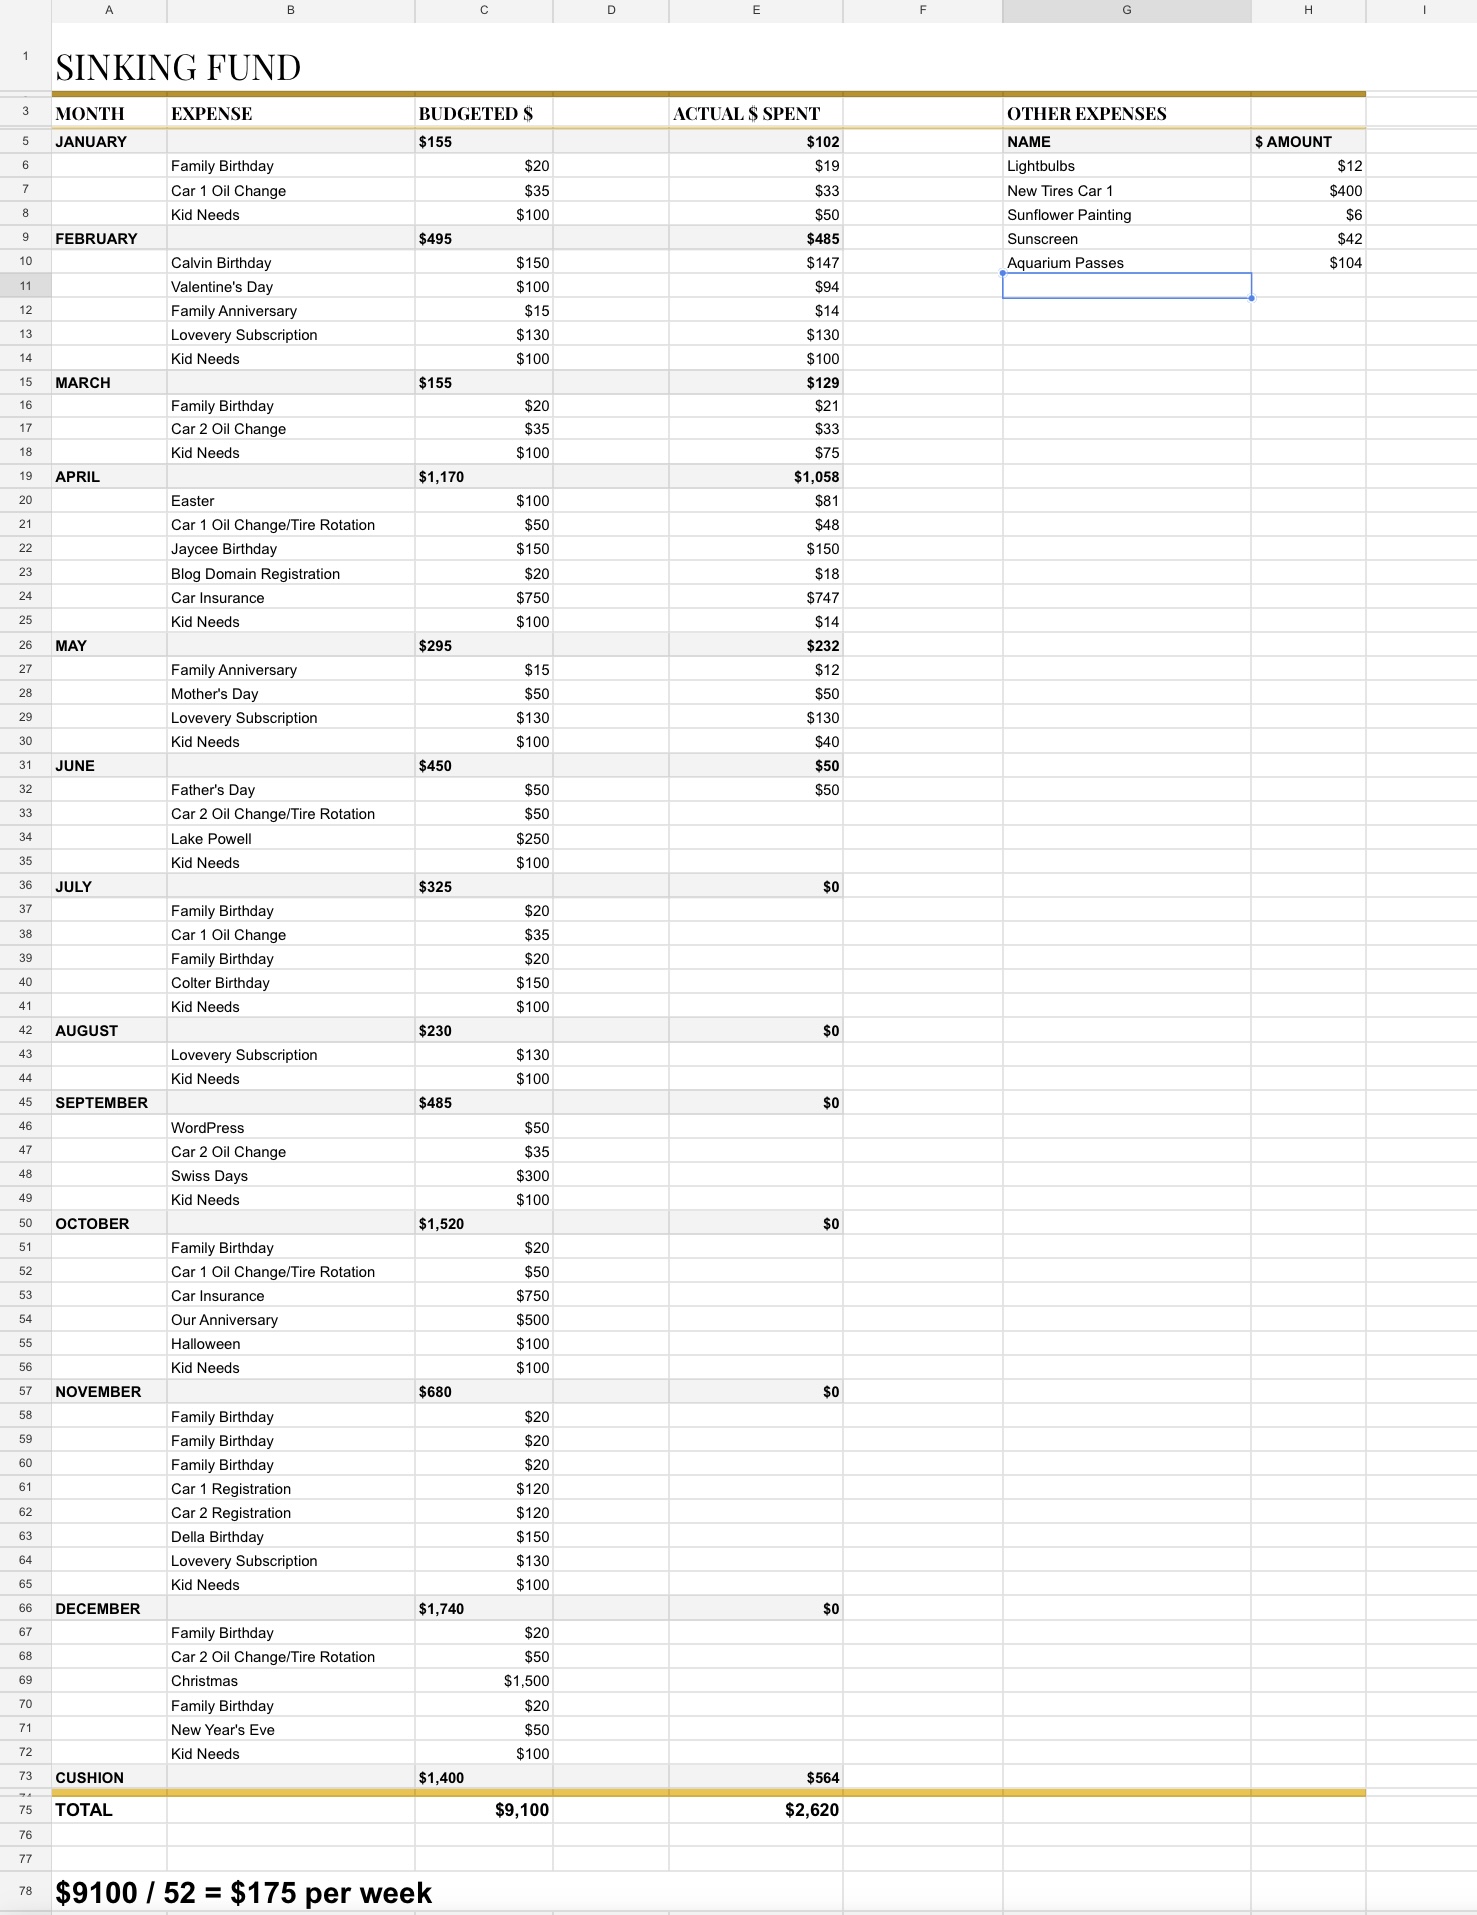
Now let’s walk through our process for making a working sinking fund. I’ll include screenshots of our sinking fund so you can get an idea of how ours is actually organized and used.
I will be replacing all of the numbers in our sinking fund with fictional values. I will also be removing any personal information for privacy purposes.
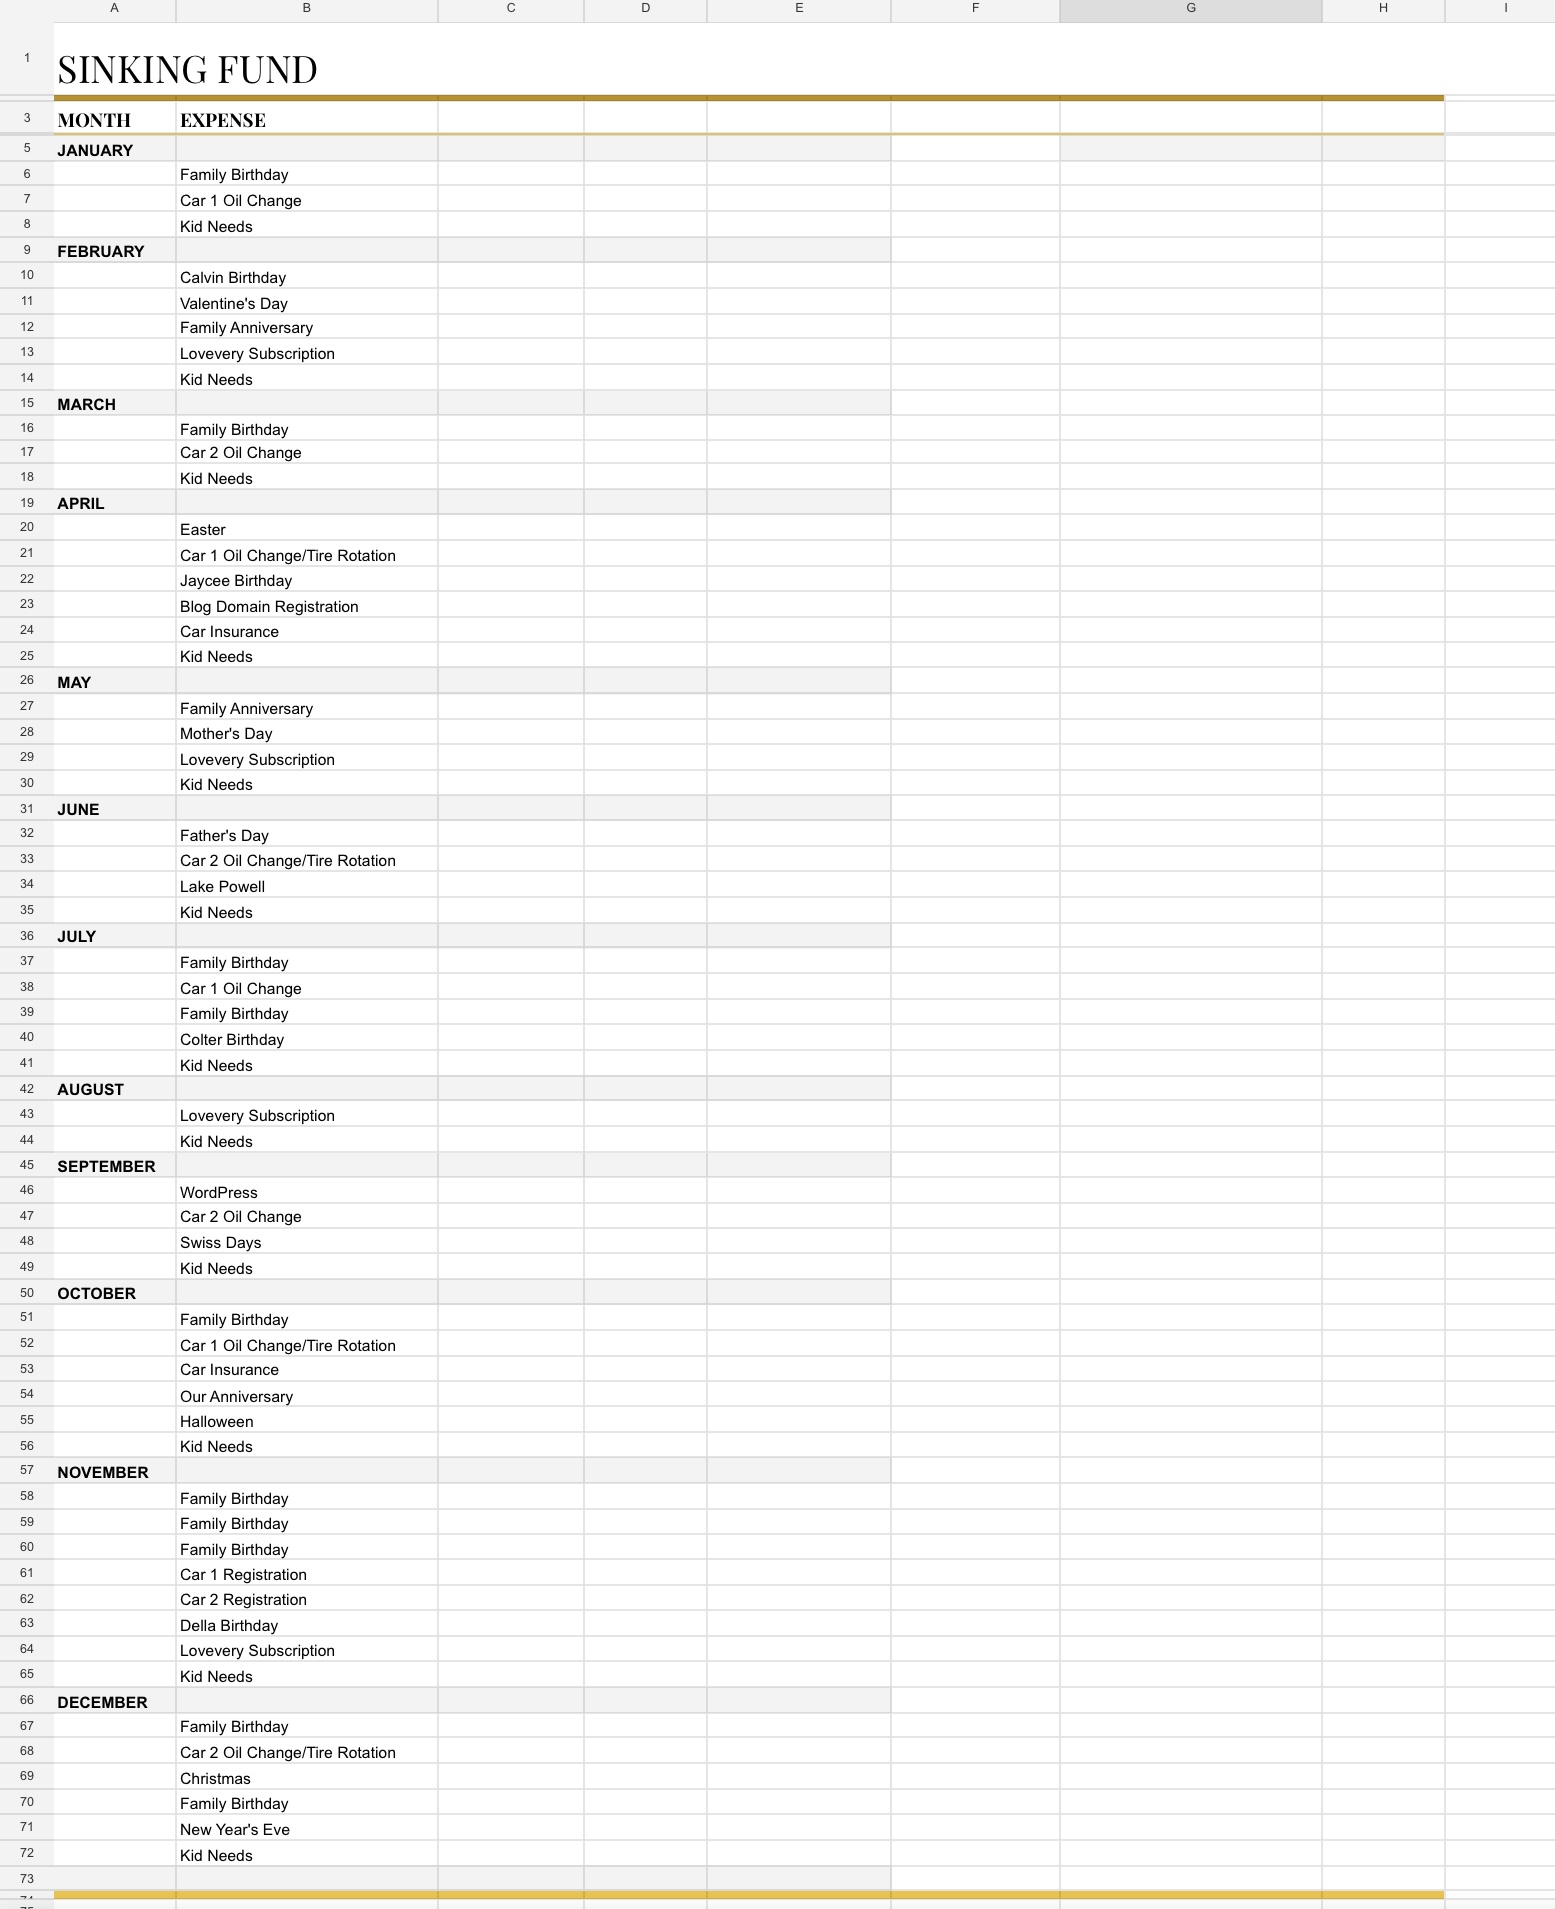
STEP ONE: WRITE DOWN ALL OF THE EXPENSES COVERED
This step is the one that took us the longest, but it’s kind of the most important. We opened a brand new document and wrote down each month in the year. Then we started brainstorming all of the unique and foreseeable expenses that that month contains.
For example, in April of this year, we had Easter, both cars needed oil changes, my birthday, my blog domain registration for the year, and our car insurance was due. In November we have four family birthdays, our car insurance renews, both of our cars need to be registered, and Calvin gets a Lovevery box.
We went through and listed every little expense that we could think of, making sure we didn’t forget any important birthdays. We also created a separate list for Christmas and decided in advance every person we would get a gift for and any other Christmas expenses we wanted to take on like donations, decorations, Christmas cards, and the like. Then we took that total and plugged into the ”Christmas” line of our sinking fund.
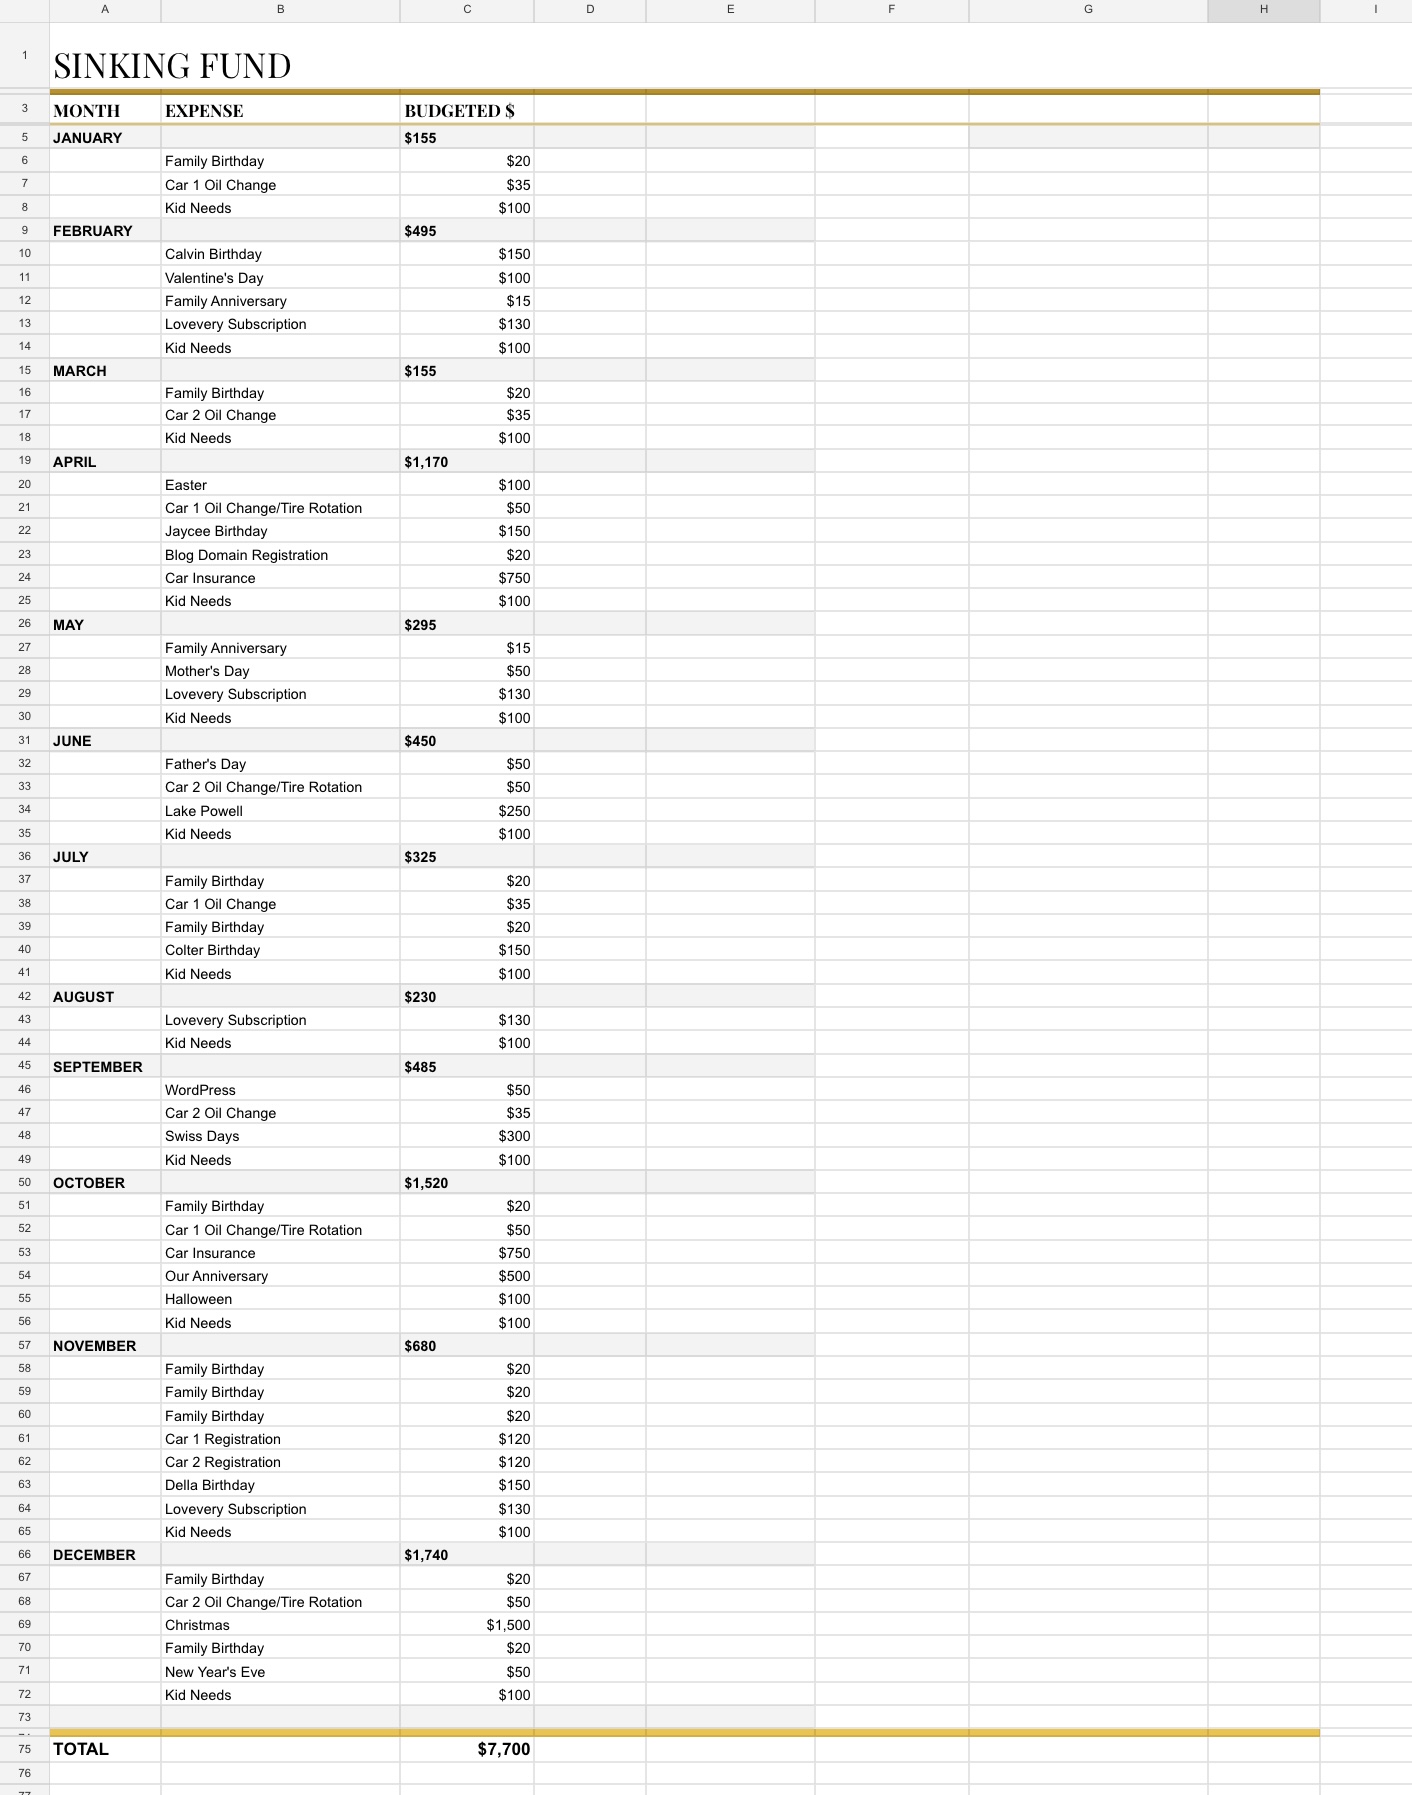
STEP TWO: ESTIMATE THE COST OF EACH PROJECTED EXPENSE
Once we felt certain that we had thought of most of the expenses we could expect for the coming year (it took almost a week to reach this point), we started estimating how much these expenses would cost. Some were easy, like our car insurance and Lovevery subscription, that have a regular reoccurring cost. For almost all of the others, we had to decide how much we wanted to spend. We set a budget for birthday gifts for our siblings, parents, kids, and each other. We decided how much we were comfortable spending on our anniversary. And we went through our entire Christmas list and decided how much we would spend on each person for the year, as well as how much we would donate etc.
Once we had a budget assigned to each line item, we organized it all into a spreadsheet. We also added a line called ”Kid Needs” to each month with $100 as the budget for it ($50 for each kid). This line is used to cover anything the kids need as they grow. This includes clothes, shoes, gadgets, hair bows, hats, swimsuits, and all the other things kids need as they grow. This money also rolls over each month. So if I only spent $20 on kid stuff in January, then February’s budget grows to $180. This facilitates spending money on the kids as needed, but also allows for more bulk purchasing to take advantage of sales.
Putting this all into a spreadsheet with a couple of easy functions to add all of the lines together showed us a total amount that we were expecting to spend on these future expenses throughout the year.
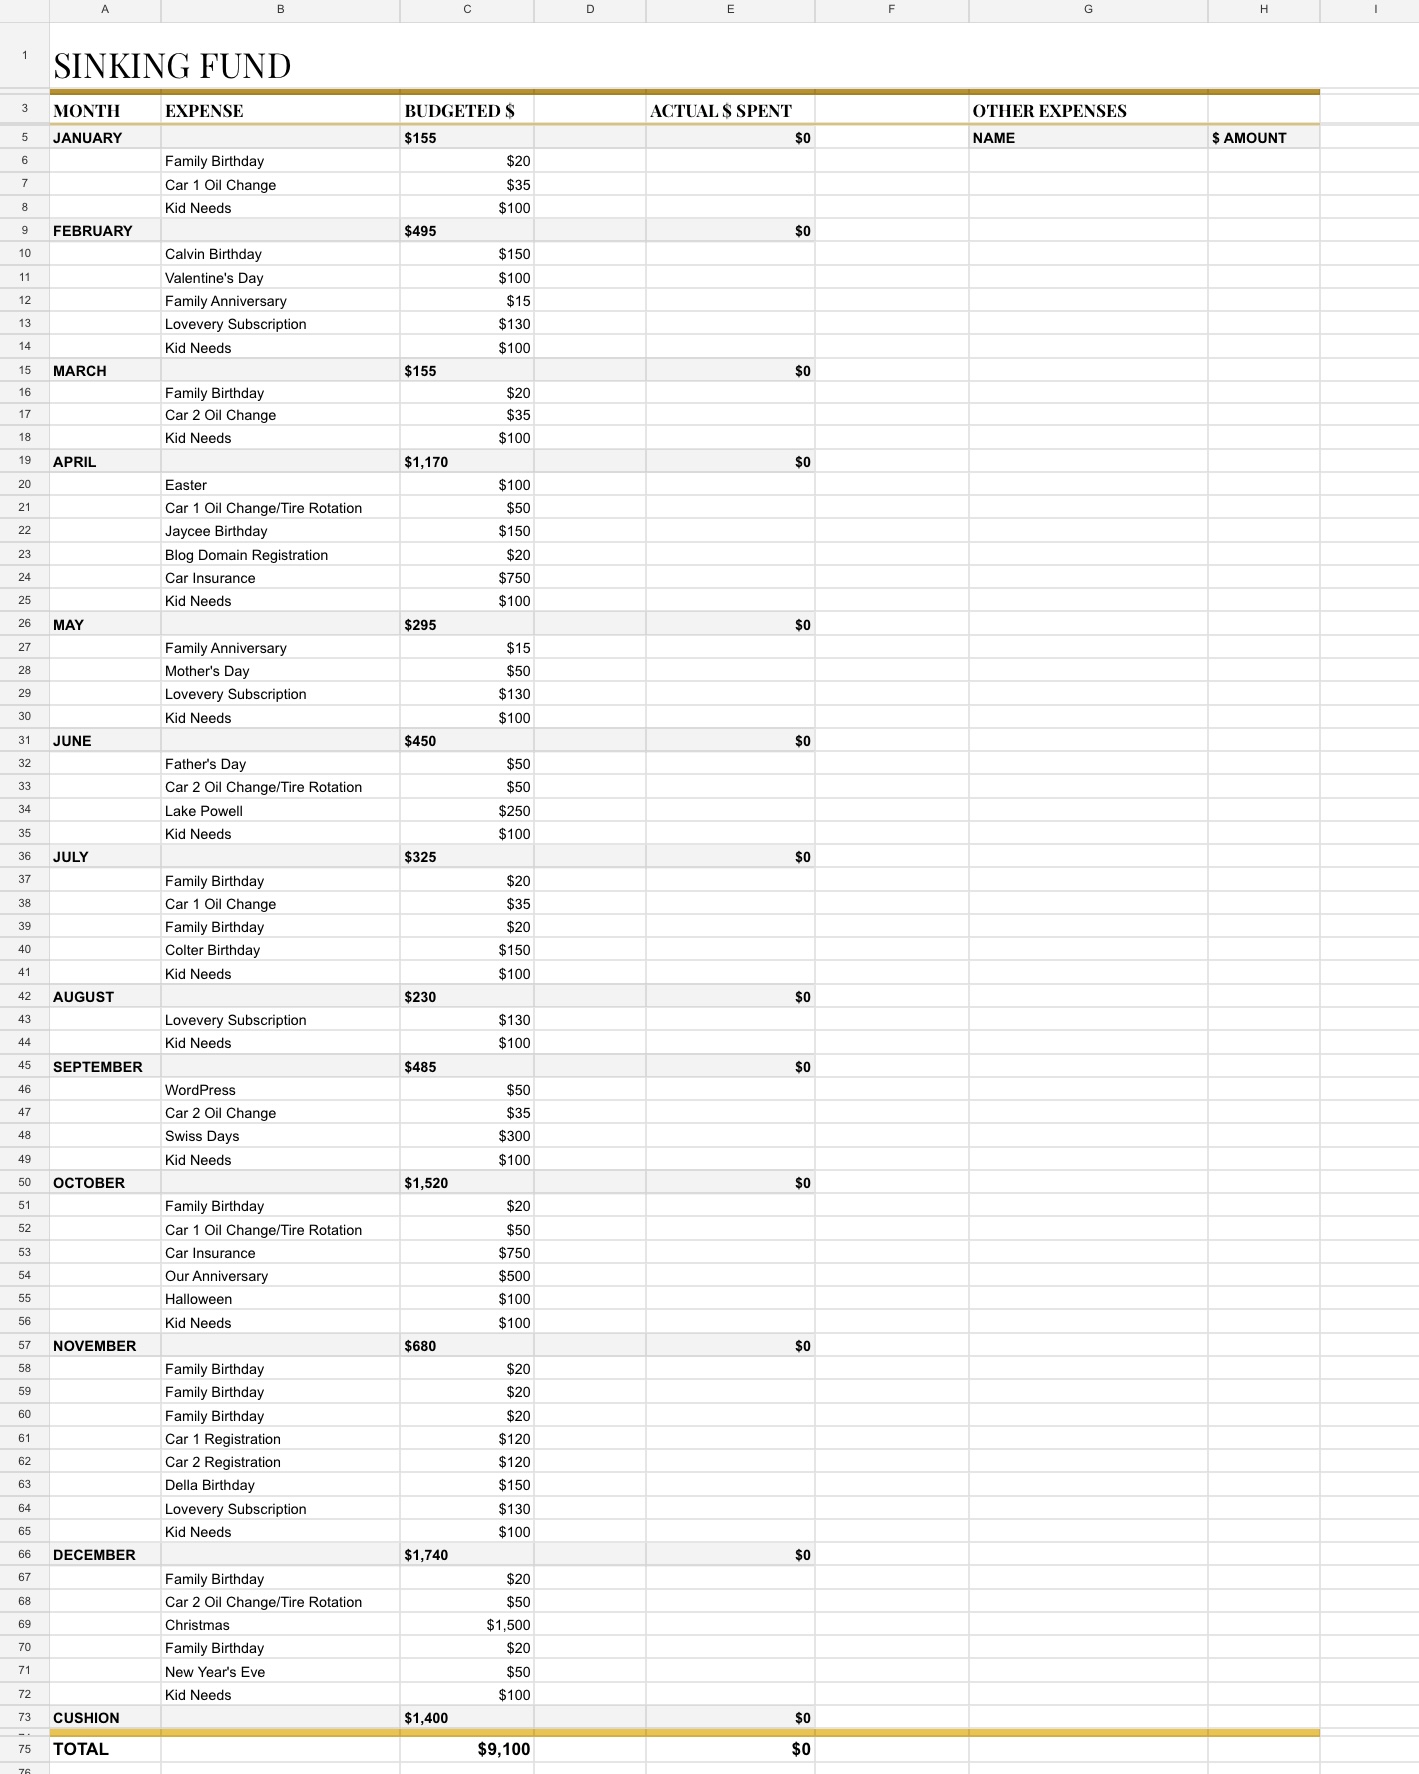
STEP THREE: DETERMINE HOW MUCH CUSHION YOU WANT
Now that you have your total expenses for the year, I recommend adding a cushion on top of that number. We use this cushion for household expenses (a new trashcan, light bulbs, decor, organization items, etc.), for unexpected car repairs, if we underestimated a tradition cost, and gas money for quick weekend trips. For us, we’ve found a cushion of $1,000-$1,500 is comfortable, but doesn’t let us be flippant with use of the sinking fund either.
We add this cushion line to the very bottom of the spreadsheet.
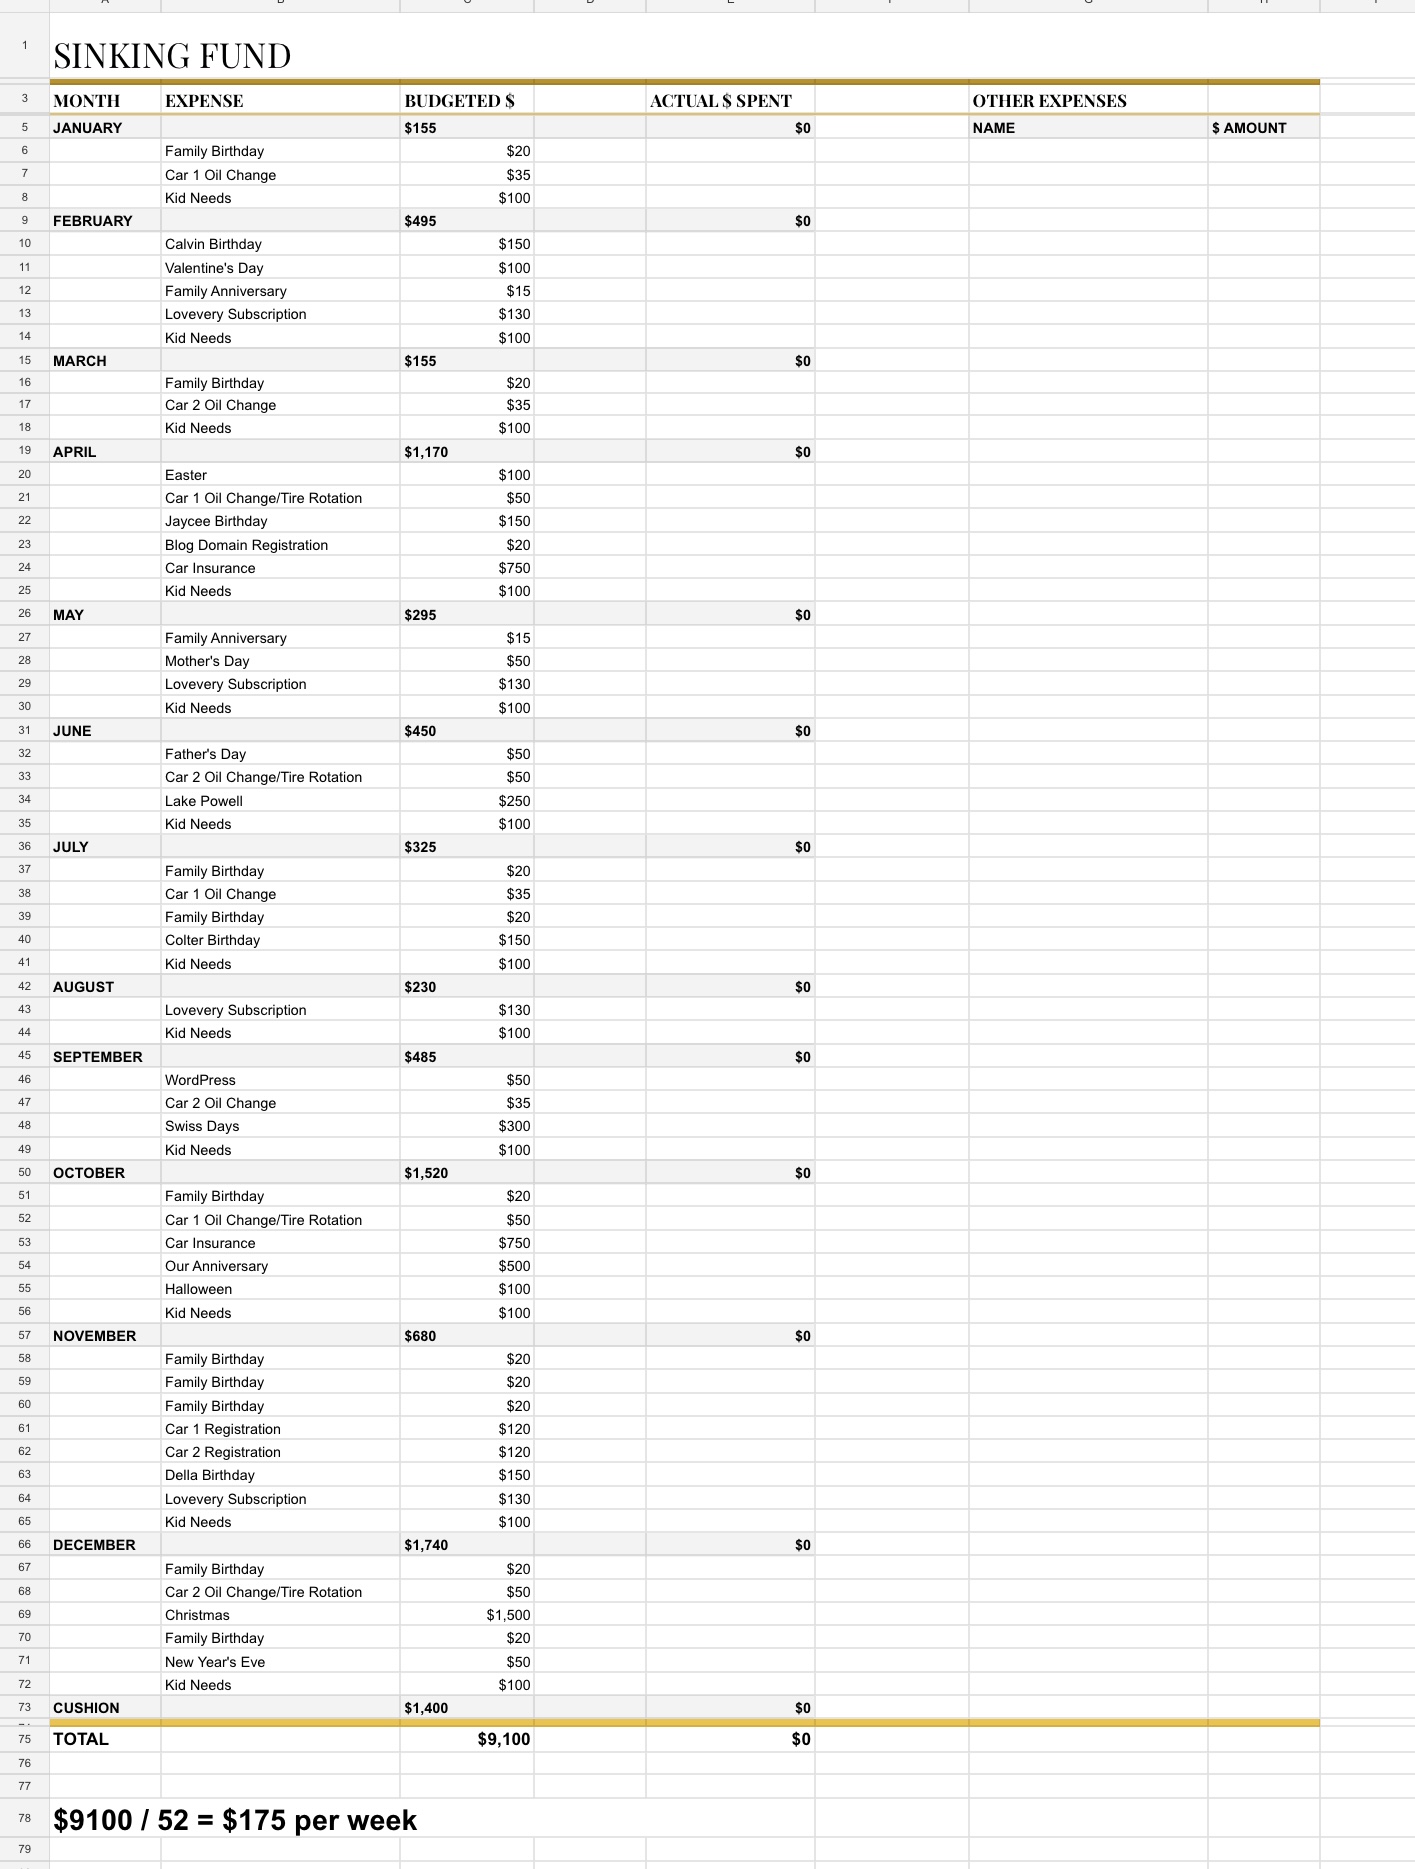
STEP FOUR: CALCULATE YOUR REGULAR CONTRIBUTION AMOUNT AND SCHEDULE
Alrighty. Now that you have your total expected expenses and your cushion total, add those two numbers together. This will give you the total amount of money you need to contribute to your sinking fund by the end of the year. We like to contribute to our sinking fund weekly, so we took our total amount and divided it by 52. If you plan to contribute biweekly, you will divided your total by 26. You could do it monthly and divide it into 12 payments or even quarterly and divide by 4.
I’ll give a quick example. Let’s say your monthly expenses came out to $4700 and you decided on a $500 cushion. If you add these numbers together, you get a total of $5200 in the sinking fund for the year. To contribute regularly to this fund you could pay $100 a week, $200 every other week, $434 every month, or $1300 per quarter.
I like the weekly option because it gives us the smallest contribution amount and feels the most manageable. We also manage our entire budget on a weekly basis, so it just makes sense to manage the sinking fund that way too.
STEP FIVE: CREATE A PLAN FOR TRACKING AND PAYING FOR PURCHASES
In my experience, it’s best to keep your sinking fund in its own account. An account that isn’t used for anything else. We were able to open an additional checking ”account” within our existing joint account with our bank. Each week when I am doing our budget management, I transfer our sinking fund contribution to that checking account and forget about it.
The other decision you need to make is how you will spend your sinking funds. The two options that immediately pop into my head are: debit card linked to sinking fund checking account or credit card only used for sinking fund purchases. We choose to use a credit card to take advantage of the cash back and to have positive activity on our credit score. Each month, any purchases made that qualify as sinking fund are put on the credit card. Then at the end of each month, we pay off the card in full from our SF checking account. This method has been working really well for us because we are very disciplined in only using that card for approved purchases.
We track our sinking fund on a spreadsheet. Any purchase that goes on that credit card is recorded on the spreadsheet, either on the appropriate line item or in the cushion area. Our spreadsheet lets us know if we have over or underestimated our expenses for the year, as well as letting us keep an easy eye on how much of our cushion is left. If the cushion amount is running out too fast (for example, last year we had a lot of unexpected car maintenance to pay for), then we simply up our weekly contribution for a little while to beef the cushion back up. Just make sure that if you do this, you change the numbers in your spreadsheet to reflect your contributions (so if you add $50 extra a week for 10 weeks, add $500 to your cushion line).
Sometimes we either don’t have our sinking fund credit card with us (rare) or we want to make purchases for sinking fund expense on our personal cards (like when we shop for Christmas or each others’ birthdays and want to keep it a surprise). In those scenarios, the purchase goes on our personal card and I transfer the appropriate funds to that person’s personal checking account. I also make a note in the spreadsheet. For example, you can see that there was $150 budgeted for my birthday and $150 recorded spent. Colter wanted to keep the surprise there, so I just transferred him the $150 and made a note on that line that said ”Transferred to Colter checking”. This just keeps us both accountable and doesn’t let either of us accidentally spend SF money on personal purchases.
I hope you found this blog post helpful and that it all made sense. Creating our sinking fund has been transformative for our budget and for being in control of our money. As our life and our expenses change, our sinking fund will grow and change too! That’s one of the things that’s so great about it.


Leave a comment